Tuesday, 19 May 2015

Moodle courses - adding buttons

Spruce up your Moodle course with buttons

I have added some code to Moodle to allow for the easy creation of navigation buttons to Moodle courses and pages. Below is a short PowerPoint guide outlining the process.

Buttons can be created from images too - just insert a link and set the Class to 'button' in exactly the same way as for the text links in the guide.

A button with an image and text is only slightly more tricky, but is best done using the HTML editor - put the image and text inside the a tags, seperated with a br linebreak.

Thursday, 30 April 2015

Revision: simple clear mind-mapping with Coggle.it

Mind Maps can be a fantastic tool to revise a topic.

Coggle.it provides a simple platform for creating Mind Maps that can be shared (as below), made collaborative, or exported for printing.

Images can be included by simply dragging and dropping onto the canvas. Linking lines can be coloured a wide variety of colours and nodes can be easily moved to achieve a clear layout. Hyperlinks can be included too (try CTRL-clicking the word "Photosynthesis" in the above example). Full, easy to follow, instructions can be displayed as a side-bar.

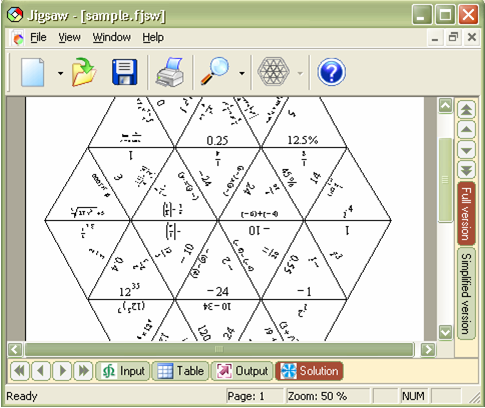
Dominoes, triominoes, world loops and more: Formulator Tarsia

A very quick post to let you know about some fantastic free software for Windows computers.

Formulator Tarsia, available free of charge from http://www.mmlsoft.com/index.php/products/tarsia, provides an interface to quickly and easily create a variety of card sort and jigsaw activities and puzzle games. Just type in terms and definitions, or questions and answers and the program will create your puzzle which can be exported to pdf for printing.

Formulator Tarsia allows for easy formatting of mathematical formula or insertion of images.

Revision: Quizlet- flashcards and more

A quick post on one of my favourite eLearning tools for revision: Quizlet.com.

Quizlet is, in essence, a flash card based revision tool; of which there are many. However, what I really like about Quizlet is how you can use your 'deck' in so many different ways to revise. You can also embed the applet into webpages, like below:


Try using the drop-down menu at the bottom right of the embed to switch to the 'Test' and 'Scatter' Study Modes.

As you can see, when embedded Quizlet decks can be used without the need for a login, but with a free account students can search and add other decks to their library, create their own card sets or even set up a Class to share decks and compete with each other to top the leaderboard in the 'Scatter' or 'Space Race' study modes.

There are many sets of terms and defintions already on QUizlet but creating your own is very easy too. Images can also be included if needed.

Embedding the Quizlet applet into a page on Moodle is very simple:

  • Open the 'deck' on the Quizlet website
  • Click on 'More...' in the tools section of the menu bar and select 'Embed'
  • Select and copy the text in the box next to your preferred Study Mode
  • Go to your Moodle course and click the 'Add and Activity or Resource' link
  • Scroll down to and click 'Web Page'
  • Click the small 'HTML' button on the window that opens and paste the copied text here
  • Type a title and short description in the relevant areas then save your web page

If necessary I can create a short video showing the whole process - just email me to ask

Wednesday, 11 March 2015

Names and class lists in Excel

Easily change formatting of names in Excel sheets


Surname, Forename or Forename Surname? ...or even First name and Surname in separate columns?
We all have our preferences but unfortunately so do the different software packages we use.

This post shares some Excel formulas to quickly and easily switch around the formatting of names.
The formulas used are summarised in the image below:
Click to enlarge

The first formulas search for a comma and return the characters on either the left (for surname) or the right (for first name). Just change the cell reference to point to the cell with Surname, Forename.

For surname:     =LEFT(A2,(FIND(",",A2)-1))
For forename:     =RIGHT(A2,(LEN(A2)-1-FIND(",",A2)))

The next formula will take a forename and a surname from separate cells and join them to Forename Surname:     =B2&" "&C2

If you want to take forenames and surnames from separate cells and output as Surname, Forename use:     =C2&", "&B2

And finally to convert Forename Surname to Surname, Forename:     =RIGHT(D2,(LEN(D2)-FIND(" ",D2)))&", "&LEFT(D2,(FIND(" ",D2))).

Try this out with this example spreadsheet (be aware this is LIVE and shared publicly!)


Tuesday, 10 February 2015

Visual Bookmarking and Sharing with Pearltrees

Create and share tiled bookmark collections with Pearltrees.


An excellent way to share links and resources with colleagues and students - collaborative lists can even be set up. One of the best features is the ease of sharing bookmarks using Pearltrees, with options to share to Google+, Twitter, Facebook, Tumblr and Reddit at the click of a button...

...and my absolute favourite, the ability to embed your bookmark tiles into a webpage:

ELearning Tools, by wgsbelearning

This can be done on Moodle too, allowing you to share links in a much more attractive and engaging way!

Thursday, 29 January 2015

eSkeletons

eSkeletons: an interactive website where you can explore and compare skeletons of mammals using high quality images of specimens.

Just a quick post that may interest the Biologists today.


eSkeletons also provides a variety of printable teaching resources including puzzles and life-size skeletons (although Lord Sugar wouldn't be impressed!).


Tuesday, 27 January 2015

GifYoutube: create short looping .gifs from YouTube clips

GifYoutube is very easy to use, just find your clip on YouTube, go to the GifYoutube website and paste the YouTube link into the box on the front page. You can then set the starting point of your gif using a sider or typing in the time in the box, with a handy preview of the video to help you. Use the right-hand slider to set the length of the clip (maximum 15 seconds)

Example

First I select the YouTube clip for my source video:

Skip to gif start point

And here is the end result:

Click to open on GifYoutube site


I'm sure there are many uses people can think of for this, but I wanted to show some short video clips as part of a starter activity: showing the clips through YouTube would have meant timing the starts, restarting the clips manually and possibly even showing each clip one after the other. What I decided to do instead was to create a table to display my four clips, side-by-side and ask students to sketch an energy profile diagram to represent what was happening in each.

Reaction A Reaction B
Reaction C Reaction D

Sunday, 18 January 2015

Making Posters Interactive with ThingLink

Making posters is a tried-and-trusted activity that students enjoy and is ideal for review of a topic, consolidation of ideas or just allowing a student greater freedom over how they present their work.


Both an advantage and a possible drawback of posters are the fact that limited information can be conveyed - so why not make the poster interactive to allow a topic to be explored in greater detail, or how about adding audio and/or video to your poster! You can achieve this, for FREE, using ThingLink!


With ThingLink you can quickly and easily create accounts for students by copying and pasting in your class list - you can even group them into classes. For each class you can have one or more 'channels' to keep images organised.
As part of the review from a recent test I had students work through their test paper with a RAG self-analysis sheet. Once they had identified an area to target for improvement they were then tasked with creating a poster on that topic, using text books and their own notes to help them. Once completed I photographed each poster and added them to a channel for that group - named 'Poster Photos' - this would allow students to find their own poster quickly and easily.


Once students have located their poster they can 'remix' the image to add it to their account and then add a series of tags to the image. I then had students add their remixed poster to a second channel - 'Interactive Posters'. This effectively allows students to submit their work to me but also keeps all of the completed work in one place. I can then publish the link to this channel on Moodle so all of the interactive posters are available for students for revision.

Finally, the ThingLink interactive images work well on phones and tablets so why not create QR codes for the best posters to stick on to the original paper copy when you put it up in your classroom?

Wednesday, 17 December 2014

Plickers

Plickers: student response system using 'paper clickers'

Plickers is a fantastic free tool that can be used to collect and store student responses quickly and easily using a a Smartphone's camera and a free app (available on both Android and iOS).

Students simply hold up a unique QR code that can be orientated in four different ways to convey responses A,B,C or D

Have a look at Plickers in action at WGSB - using the same password as that needed on our Teaching and Learning webiste, or watch this 2-minute guide:

Student responses can be easily reviewed using the 'Reports' feature but unfortunately cannot currently be exported to a spreadsheet or external mark book

Plickers remains an excellent alternative to more traditional student response systems (thumbs, number of fingers, coloured cards etc.) for a number of reasons:

  • Students must all participate as those who do not can be easily identified
  • Responses are gathered very quickly
  • Different responses are counted automatically
  • Students can see when their response has been recorded
  • Responses of individual students can be stored indefinitely for later review
  • Responses can be easily shared with the class instantly

The Plickers Website has plenty of information, including a detailed Getting Started guide, as well as the cards you need to get going, why not try it out?

Wednesday, 16 July 2014

Purposegames - Easy to make image-based quizzes

Previously I emailed around about a useful site for creating image-based labelling quizzes: purposegames.com. This site is excellent for subjects like Biology, Geography and PE and I'm sure can be useful to any subject area with creative use!

There are many good quizzes already available to use and it is very easy to create your own - particular the 'Dot quizzes'. Games can be collected into playlists or included in Tournaments to get a competitive aspect.

The screenshot shows an example of how the quizzes are presented:

You can check out the playlist I have created for AS Applied Science, including the example above: HERE. This playlist consists of Dot quizzes created by me or found in the existing library.

Here are some examples of the other types of game you can find or create:

Drillster: an interactive learning and test application

Drillster is one of my favourite eLearning tools - it is essentially a flash-card type of learning or revision resource that has an adaptive aspect by use of an alogrithm to monitor progress - for full details see the Drillster info page.

Drillster is incredibly easy to use when creating Drills and can include text, images or both. Drillster is ideal for learning names and definitions and would work well for any vocabulary learning in any subject. Drills work well on mobile devices and tablets (at least on my Android devices).

Drills can be embedded into a web page, or you can just provide a weblink to the Drill itself. A free account is required to create Drills (although you can login using a Google or Facebook account) but no account is necessary for students to use a Drill. If students do set up an account Drills become far more effective by monitoring their progress over time and the algorithm will act to 'top-up' their learning more effectively.

Examples I have created are included below and there are many more available on the 'Drill Store' although a number are foreign-language.

Monday, 31 March 2014

Creating 'interactive worksheets'

Here is the exemplar from my session on using QR codes in learning resources, creating 'interactive worksheets'.

Tuesday, 17 September 2013

Getting Started with Moodle

The first instructional video for Moodle is out! We start of with the basics of configuring course settings, naming and organising course sections and uploading files.

Friday, 26 April 2013

Moodle: allowing self-enrolment

New courses added to Moodle will allow students to self-enrol by default. However, you may not always wish this to be the case. Similarly you may want to enable self-enrolment in a pre-existing course. In this case you need to enter the course in question. Open the Settings menu and expand the Course administration section, within the Users submenu you need to access the Enrolment methods section and click Self enrolment. Refer to the image below:


If the Setting menu is not obvious check the top left for a small vertical tab- the menu can be collapsed to a left-hand ribbon bar.

Thursday, 25 April 2013

Moodle resources - uploaded files.

The way that Moodle 2.4 handles uploaded files has changed: files can now be easily embedded into a Moodle page for viewing. When uploading new files you can select how the link will behave, however some of you may wish to change the behaviour of an existing file. In the example below I change a .pdf file from being displayed embedded in the page to opening in a new window. Locate your resource on the course page and click the cog icon to edit ("update") the resource:

On the menu that follows you will see the resource name and a white box for a description- if this is empty you must enter something here- in Moodle 2.4 this is a required field as the resources will appear as a list for the course (if the name is self-explanatory I have just copy and pasted it here again on occasion).

Below the file selection area is the Options block, here you need to change the drop-down menu to your preference- in this example Open.

Click 'Save and return to course' and check that clicking the link does what you expected.

Monday, 25 March 2013

Crossword maker

Crosswords are always a favourite but can be a bore to create. ArmoredPenguin.com allows for really easy creation of crosswords that actually look good when printed (no adverts or branding). See my example:

You can type your clues and answers in on the web-based creation page or import a .txt file, so long as you separate your words from the clues with a colon :

Unlike many other crossword makers, this one supports multiple word answers, either leaving spaces or combining the words for the grid and automatically adding the number of words to the clue.

The site is explained well and is easy to use, click below and check it out:

Wednesday, 20 March 2013

ThingLink

Quick post today.

Label diagrams or photos with interactive labels. This can be a really useful homework task with huge potential. I've created my own ICT related example below to demonstrate the idea.

When setting a 'thinglink' task as homework I suggest you include success criteria such as - "X youtube links and Y wikipedia links maximum, all links must have a description." to make sure students get the most out of this. Links to thinglinks could be uploaded to Moodle or emailed to you and can easily then be embedded or linked for future use by your students.

Monday, 25 February 2013

QR codes

What is a QR code?

The short answer is that a QR code is like a barcode that can be scanned by a smartphone and contains information, usually a web link. For a more detailed answer to this, see whatisaqrcode.co.uk

Why would I want to use a QR code?

Any time you want to be able to easily share a piece of electronic information with a smartphone user really. What I tend to use these for is sharing links (URLs) to video clips on YouTube or providing hints or additional background information for support or for extension to tasks and QR codes are an ideal way to do this. Not every student will have access to a suitable device but at WGSB the ratio appears to be somewhere between 1 in 5 to 1 in 2 students (from Year 7 -13) from my observations so small groups sharing a device is likely to work without a problem.

In my classrooms I tend to have a projector (although for the most part visibility is far from optimal) and most of the time, working speakers and I may want to show a short video clip for a starter or a longer clip that students will answer questions on in a longer activity. I show the clip once or maybe twice to the whole class but some students will not have taken everything in and will need or want to watch the clip again. Why not let them do so on their own device so they can watch just the bits they need to, as many times as they need to?

How do I go about using a QR code?

Let's look at an example: I recently put together an activity for a Year 7 lesson on the greenhouse effect and global warming. I found an excellent YouTube clip that I wanted to set questions based on.

I posted the link on Moodle so I, my colleagues and our students can all easily find this both in the lesson and later on if needed, the short link (found using the 'Share' option on YouTube) is http://youtu.be/HK8LLWSIIm4. This is worth including in your resource so students without the ability to scan a QR code have the option of typing in a short URL instead. To generate the QR code I visit a free generation service such as QRStuff.com and paste the URL for my YouTube clip into the relevant box, click 'generate' if required (not on qrstuff) then preferably try scanning the code onscreen to test it. Here's my QR code:

Download the image (give it a sensible name!) and you can then Insert the image into your worksheet or handout in the same way you'd insert any other image. The images can be pretty small but should have some clear space around them. Older and cheaper phones won't have brilliant cameras so could struggle if you make the image too small. If you have a long URL the QR code will be more complicated and will be harder to scan so consider using a URL shortener such as Google's offering or the 'qrs.ly' service offered by QRStuff (both are free). I've shared my example worksheet through Dropbox and you can get the file here to see how it looks

Wednesday, 30 January 2013

Word/Tag Clouds

Traditional word clouds can be really useful as a visual summary of a text, the size of the word depends on how often it appears in the text, allowing the key points to be conveyed quickly. I have used these traditional word clouds to convey the specification points for GCSE Chemistry units.

Wordle: Additional Chemistry Topic 1 (Edexcel)
In an interactive word cloud each word or 'tag' becomes a clickable link. I have found that these clouds work best with a list of keywords and with maximum sizing rather than linking to occurrence. An example is provided below, with key words about spreadsheets. In this example clicking a tag will search for "spreadsheet" and the text of the tag.

Get Adobe Flash player

Tags can also be fitted into shapes that provide additional visual stimulus- for this to be effective a larger word list is needed and trying to size tags by frequency of occurrence makes shape fitting awkward but good results can be achieved:

Get Adobe Flash player

Get Adobe Flash player

Try it yourself at Tagul (excellent for interactive and shaped clouds) or Wordle (best for traditional clouds)